
[toc]
Introduction
For the past few days I am playing with my MXChip and had written some articles about the same, you should be able to find those here. Here in this article, we will send some data to our Azure IoT hub and we will connect an Azure Function with our IoT Hub using IoTHubTrigger Event Hub Trigger Attribute. If you are ready, let’s do this.
Background
As I said this article is part of my IoT article series, so if you have read my previous articles on this topic, it may be easier for you to understand the concept. Before you start this article, please make sure that you had already created an Azure IoT hub and it is running. You can always send the messages to this IoT Hub either by connecting the actual device, let’s say an MXChip or using a simulating device.
IoTHubTrigger Demo
Creating an Azure Function App
I am going to create an Azure Function App in Visual Studio, if you are not sure about how we can create and publish the Azure Function, please read this section of my previous article. Let’s create a new solution now.

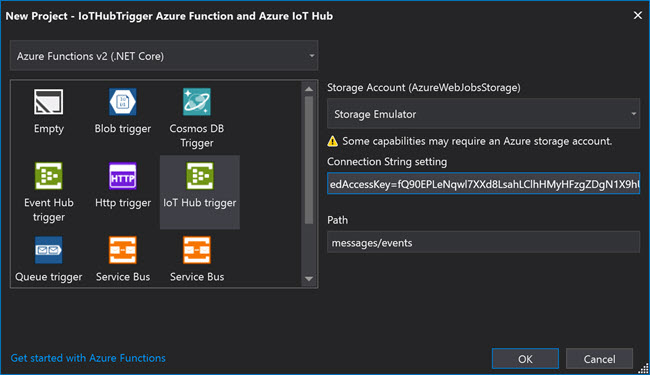
Once you click OK, a new Azure Function will be generated for you with some initial codes in it. Let’s edit the Function as below.
using Microsoft.Azure.EventHubs;
using Microsoft.Azure.WebJobs;
using Microsoft.Extensions.Logging;
using System.Text;
using IoTHubTrigger = Microsoft.Azure.WebJobs.EventHubTriggerAttribute;

namespace IoTHubTrigger_Azure_Function_and_Azure_IoT_Hub
{
    public static class IoTHubFunc
    {
        [FunctionName("IoTHubData")]
        public static void Run(
            [IoTHubTrigger("messages/events", Connection = "IoTHubTriggerConnection", ConsumerGroup ="FuncGroup")]EventData message,
            ILogger log)
        {
            log.LogInformation($"C# IoT Hub trigger function processed a message: {Encoding.UTF8.GetString(message.Body.Array)}");
        }
    }
}
Here the IoTHubTriggerConnection is the connection string we are providing in the local.settings.json file. The consumer group will come into the play if you have many applications which need to be receiving the data from your IoT Hub. Below is the class definition of EventHubTriggerAttribute.
public sealed class EventHubTriggerAttribute : Attribute
    {
        public EventHubTriggerAttribute(string eventHubName);

        public string EventHubName { get; }
        public string ConsumerGroup { get; set; }
        public string Connection { get; set; }
    }
Send data to the Azure IoT Hub
As I mentioned earlier, there are two ways you can send the data to the Azure IoT Hub.
- Using a device, for example, MXChip
- Simulated device
Once the data is been sending, you can see the message received count in Azure IoT Hub in the overview section.
Run the Azure Function
So, the IoT Hub is started receiving the messages from the device, and now we can use our Azure Function to pull the data from the IoT hub with the help of IoT hub Trigger. Run your Function App, Simulated Device application and see the output.

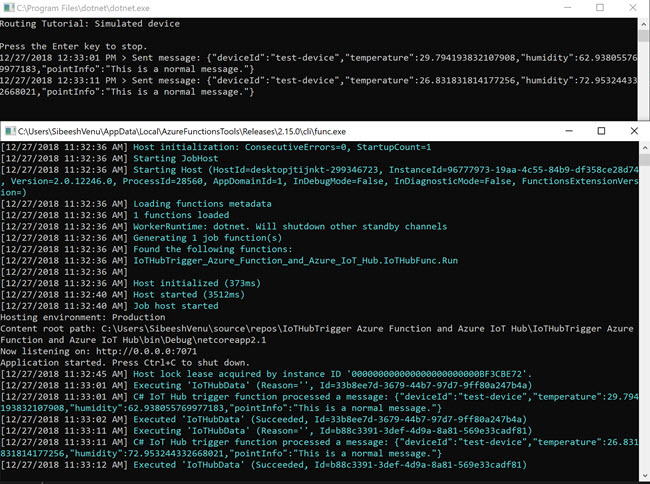
As you can see in the output, our Azure Function app is receiving the data from Azure IoT hub instantly. Now you can perform any actions with this data. I will leave that to you.
Conclusion
Wow!. Now we have learned,
- Usage of Azure IoT Hub Trigger in Azure Function
- Creating Azure Function App
- See the Data from Azure IoT Hub in the Azure Function App
You can always ready my IoT articles here.
Your turn. What do you think?
Thanks a lot for reading. Did I miss anything that you may think which is needed in this article? Could you find this post as useful? Kindly do not forget to share me your feedback.
Kindest Regards
Sibeesh Venu