Validation Using Template Driven Forms in Angular 5
[toc]
Introduction
In this post, we are going to see how to do validation using template driven forms in Angular 5, this is just a different approach that you can follow, as we have discussed another way in our previous post. At the end of this article, you will get to know how you can implement validations in Angular 5 application using Template Driven Forms. This post is a continuation of the course Developing an Angular 5 App series if you haven’t gone through the previous posts yet, I strongly recommend you to do that. You can find the links to the previous posts below. I hope you will like this article.
Developing an Angular 5 App series
These are the previous posts in this series. Please go ahead and have a look.
- What Is New and How to Set Up our First Angular 5 Application
- Angular 5 Basic Demo Project Overview
- Generating Your First Components And Modules in Angular 5 App
- Implement Validations in Angular 5 App
Source Code
You can always clone or download the source code here
Background
Validations have a vital role in all application no matter in what language it is been developed. And since it is an essential part, there are many ways to achieve it. We are going to see Template Driven Forms approach here.
Using the code
It is recommended to clone the project from GitHub, so that you can try everything your own. Let’s go ahead and write some codes now.
Install Bootstrap
Before we begin, let’s install bootstrap in our application.
PS F:\My Projects\ng5> npm install bootstrap --save
As we are developing this application using Angular CLI, we can add the reference of Bootstrap in our Angular-CLI.json file. The styles section of that file will look like below after you add the reference.
"styles": [
        "styles.css",
        "../node_modules/bootstrap/dist/css/bootstrap.min.css"
      ]
Please be noted that there are many other ways to configure Bootstrap in our application, here we are not going to explain that.
Importing ngForm to a variable
Let’s clean codes in our Registration component and add a new form which has a form variable, and this form variable can hold the values of our form. There are many things you can do with this variable, for now, let’s say it is our model values container.
<div class="container">
  <div class="row">
    <div class="no-float center-block col-lg-4 col-sm-4">
      <mat-card>
        <mat-card-header>
          <img mat-card-avatar src="../../../assets/images/App-login-manager-icon.png">
          <mat-card-title>Sign up</mat-card-title>
          <mat-card-subtitle>Trust us for your data, and sign up</mat-card-subtitle>
        </mat-card-header>
        <mat-card-content>
          <form #regsiterForm="ngForm" (ngSubmit)="register(regsiterForm)">
          </form>
        </mat-card-content>
      </mat-card>
    </div>
  </div>
</div>
import { OnInit, Component } from "@angular/core";

@Component({
  selector: 'app-registration',
  templateUrl: './registration.component.html',
  styleUrls: ['./registration.component.css']
})
export class RegistrationComponent implements OnInit {
  constructor() {
  }

  ngOnInit() {
  }
}
Implement Validation for User Name field using Template Driven Forms
As we have created our form, now it is time to generate out input controls into it.
<form #regsiterForm="ngForm" (ngSubmit)="register(regsiterForm)">
    <div class="signup-fields">
        <div class="form-group">
            <input type="text" required name="userName" class="form-control" placeholder="User Name">
        </div>
        <div>
            <button class="btn btn-primary btn-block" type="submit">Signup</button>
        </div>
    </div>
</form>
What we have above is a simple HTML with template driven form, where we are going to introduce the validation. Let’s modify the userName field now.
<input type="text" [(ngModel)]="userName" #userName="ngModel" required name="userName" class="form-control" placeholder="User Name">
What we are trying to achieve by the above code is, creating a reference variable userName and assign the input value to it. Basically, this is a two-way binding, where we can set the data from our component and update it in the form, and vice versa. Now if you run your application, you should see an error as below.
Uncaught Error: Cannot assign to a reference or variable!
    at _AstToIrVisitor.visitPropertyWrite (compiler.js:26025)
    at PropertyWrite.visit (compiler.js:4585)
    at convertActionBinding (compiler.js:25475)
    at eval (compiler.js:27987)
    at Array.forEach (<anonymous>)
    at ViewBuilder._createElementHandleEventFn (compiler.js:27983)
    at nodes.(anonymous function) (webpack-internal:///./node_modules/@angular/compiler/esm5/compiler.js:27620:27)
    at eval (compiler.js:27928)
    at Array.map (<anonymous>)
    at ViewBuilder._createNodeExpressions (compiler.js:27927)
This is because we are using the same name for both model and reference variable. So we should change it. To do so, let’s create a User Model (user.model.ts) and reference it to our Register component.
export class User {
    id: any;
    userName: string;
    email: string;
    userRole: string;
    profileImage: string;
    phoneNumber: string;
    firstName: string;
    lastName: string;
}
import { User } from '../models/user.model'
Now we can change our input as below.
<input type="text" [(ngModel)]="user.userName" #userName="ngModel" required name="userName" class="form-control" placeholder="User Name">
Please make sure that to declare a user in registration component.
export class RegistrationComponent implements OnInit {
  user = new User();
  constructor() {
  }

  ngOnInit() {
  }
}
Now if you run your application, you can see that the Submit button will be enabled only if the form is valid, that is, only if you enter any values in the username field.
Decorate the validation message
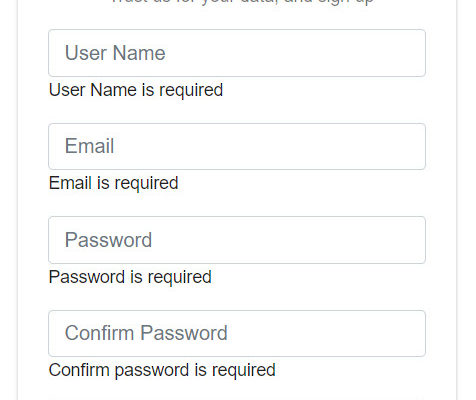
Now we know that our form is working fine, but don’t we need to give a message to the users if they haven’t given any values in the fields? Let’s add few more markups in our HTML.
<div class="form-group" [class.has-error]="userName.invalid" [class.has-success]="userName.valid">
    <input type="text" [(ngModel)]="user.userName" #userName="ngModel" required name="userName" class="form-control" placeholder="User Name">
    <span class="help-block" *ngIf="userName.errors?.required">
                  User Name is required
                </span>
</div>
We are enabling the class “has-error” and “has-success” dynamically by checking the valid and invalid property of userName field. We are also showing our required field message in a new span if there are any required errors in our userName model. Now if you run your app, you can see that the validation is working fine.
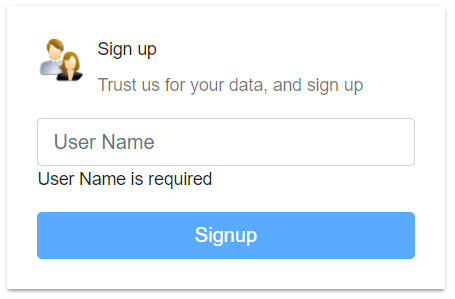
But isn’t that validation showing by default, we should show the message only if the user touched our field, and refused to type anything right? Let’s add “userName.touched” in our markup.
<div class="form-group" [class.has-error]="userName.invalid && userName.touched" [class.has-success]="userName.valid">
    <input type="text" [(ngModel)]="user.userName" #userName="ngModel" required name="userName" class="form-control" placeholder="User Name">
    <span class="help-block" *ngIf="userName.errors?.required && userName.touched">
                  User Name is required
                </span>
</div>
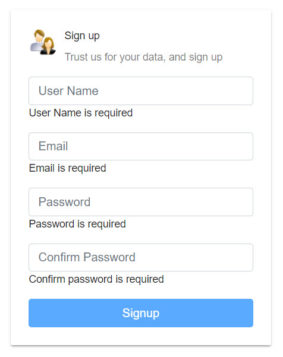
Implement the validation for other fields as well
Now it is time to implement the same in other fields.
<div class="container" style="margin-top:100px;">
  <div class="row justify-content-center align-items-center">
    <div class="col-lg-4 col-sm-4 center-block ">
      <mat-card>
        <mat-card-header>
          <img mat-card-avatar src="../../../assets/images/App-login-manager-icon.png">
          <mat-card-title>Sign up</mat-card-title>
          <mat-card-subtitle>Trust us for your data, and sign up</mat-card-subtitle>
        </mat-card-header>
        <mat-card-content>
          <form #regsiterForm="ngForm" (ngSubmit)="register(user)">
            <div class="signup-fields">
              <div class="form-group" [class.has-error]="userName.invalid && userName.touched" [class.has-success]="userName.valid">
                <input type="text" [(ngModel)]="user.userName" #userName="ngModel" required name="userName" class="form-control" placeholder="User Name">
                <span class="help-block" *ngIf="userName.errors?.required && userName.touched">
                  User Name is required
                </span>
              </div>
              <div class="form-group" [class.has-error]="email.invalid && email.touched" [class.has-success]="email.valid">
                <input type="text" required [email]="user.email !== ''" [(ngModel)]="user.email" name="email" class="form-control" placeholder="Email"
                  #email="ngModel">
                <span class="help-block" *ngIf="email.errors?.required && email.touched">
                  Email is required
                </span>
                <span class="help-block" *ngIf="email.errors?.email && email.touched">
                  Email is invalid
                </span>
              </div>
              <div class="form-group" [class.has-error]="password.invalid && password.touched" [class.has-success]="password.valid">
                <input type="password" [(ngModel)]="user.password" required class="form-control" name="password" placeholder="Password" #password="ngModel">
                <span class="help-block" *ngIf="password.invalid && password.touched">
                  Password is required
                </span>
              </div>
              <div class="form-group" [class.has-error]="confirmPasswordControl.invalid && confirmPasswordControl.touched" [class.has-success]="confirmPasswordControl.valid">
                <input type="password" required class="form-control" name="confirmPassword" placeholder="Confirm Password" [(ngModel)]="confirmPassword"
                  #confirmPasswordControl="ngModel">
                <span class="help-block" *ngIf="confirmPasswordControl.errors?.required && confirmPasswordControl.touched">
                  Confirm password is required
                </span>
              </div>
              <div>
                <button class="btn btn-primary btn-block" type="submit" [disabled]="regsiterForm.invalid">Signup</button>
              </div>
            </div>
          </form>
        </mat-card-content>
      </mat-card>
    </div>
  </div>
</div>
For email validation, we have given an additional attribute and set the condition as [email]=”user.email !== ””, this is for not showing both the required validation and email validation together. This will show the required message if the user touched the field and not giving any values, and the email validation will get fired only if the entered value is not a valid email. Sounds good?
Add register function
Finally, let’s add our function register.
import { OnInit, Component } from "@angular/core";
import { User } from '../models/user.model';
@Component({
selector: 'app-registration',
templateUrl: './registration.component.html',
styleUrls: ['./registration.component.css']
})
export class RegistrationComponent implements OnInit {
user = new User();
constructor() {
}
ngOnInit() {
}
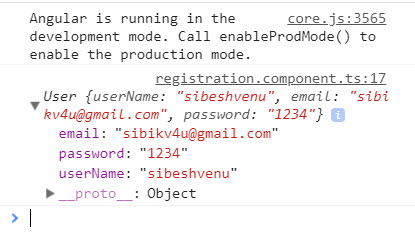
register(user: User): void{
console.log(user);
}
}
Once it is done, let’s open our browser console and see the data.
Here we have seen how we can implement validation using template driven form. I will write my next article about implementing custom validators using directives in Angular, for comparing our password and confirm password field. Till then, bye.
Conclusion
Thanks a lot for reading. Did I miss anything that you may think which is needed? Could you find this post as useful? I hope you liked this article. Please share me your valuable suggestions and feedback.
Your turn. What do you think?
A blog isn’t a blog without comments, but do try to stay on topic. If you have a question unrelated to this post, you’re better off posting it on C# Corner, Code Project, Stack Overflow, Asp.Net Forum instead of commenting here. Tweet or email me a link to your question there and I’ll definitely try to help if I can.
Kindest Regards
Sibeesh Venu