Sibeesh Passion

Top Menu

  • Home
  • Search
  • About
  • Privacy Policy

Main Menu

  • Articles
    • Azure
    • .NET
    • IoT
    • JavaScript
    • Career Advice
    • Interview
    • Angular
    • Node JS
    • JQuery
    • Knockout JS
    • Jasmine Framework
    • SQL
    • MongoDB
    • MySQL
    • WordPress
  • Contributions
    • Medium
    • GitHub
    • Stack Overflow
    • Unsplash
    • ASP.NET Forum
    • C# Corner
    • Code Project
    • DZone
    • MSDN
  • Social Media
    • LinkedIn
    • Facebook
    • Instagram
    • Twitter
  • YouTube
    • Sibeesh Venu
    • Sibeesh Passion
  • Awards
  • Home
  • Search
  • About
  • Privacy Policy

logo

Sibeesh Passion

  • Articles
    • Azure
    • .NET
    • IoT
    • JavaScript
    • Career Advice
    • Interview
    • Angular
    • Node JS
    • JQuery
    • Knockout JS
    • Jasmine Framework
    • SQL
    • MongoDB
    • MySQL
    • WordPress
  • Contributions
    • Medium
    • GitHub
    • Stack Overflow
    • Unsplash
    • ASP.NET Forum
    • C# Corner
    • Code Project
    • DZone
    • MSDN
  • Social Media
    • LinkedIn
    • Facebook
    • Instagram
    • Twitter
  • YouTube
    • Sibeesh Venu
    • Sibeesh Passion
  • Awards
  • Linux Azure Function Isolated Dot Net 9 YAML Template Deployment

  • Build, Deploy, Configure CI &CD Your Static Website in 5 mins

  • Post Messages to Microsoft Teams Using Python

  • Get Azure Blob Storage Blob Metadata Using PowerShell

  • Deploy .net 6 App to Azure from Azure DevOps using Pipelines

.NETCodeProjectMVC
Home›.NET›Uploading and Downloading in MVC Step-by-Step

Uploading and Downloading in MVC Step-by-Step

By SibeeshVenu
June 14, 2015
1941
0
Share:

Introduction

I hope you all are fine. Today we will learn how to perform upload and download operations in MVC. Please refer to the step-by-step approach in learning Model View Controller if you are new to MVC. Our MVC Master, Shivprasad koirala has explained the concepts in a perfect way.

Download the source code

  • Uploading and Downloading in MVC Step-by-Step
  • Background

    Some days earlier, I got a requirement to develop a upload and download mechanism in my MVC application. After completing it perfectly, I decided to share it with you all.

    Using the code

    Before moving further into the details, let us first list the key points we will explain in this article:

  • Create a MVC application.
  • Create a controller.
  • Create View depending on the controller.
  • Change the RouteConfig as needed.
  • Create ActionResult for the actions.
  • Create a folder where we need to save the downloaded files.
  • Let us start with creating a controller called “myAction”.
    [csharp]
    using System;
    using System.Collections.Generic;
    using System.IO;
    using System.Linq;
    using System.Web;
    using System.Web.Mvc;
    namespace UploadDownloadInMVC.Controllers
    {
    public class myActionController : Controller
    {
    //
    // GET: /myAction/
    }
    }
    [/csharp]

    As you can see that the controller is empty; we will be writing the action results next.
    [csharp]
    public ActionResult Index()
    {
    foreach (string upload in Request.Files)
    {
    if (Request.Files[upload].FileName != “”)
    {
    string path = AppDomain.CurrentDomain.BaseDirectory + “/App_Data/uploads/”;
    string filename = Path.GetFileName(Request.Files[upload].FileName);
    Request.Files[upload].SaveAs(Path.Combine(path, filename));
    }
    }
    return View(“Upload”);
    }
    [/csharp]

    The action result shown above is for index. So, whenever the application loads, the action result will be fired. For that, the following changes should be done for RouteCofig.
    [csharp]
    public class RouteConfig
    {
    public static void RegisterRoutes(RouteCollection routes)
    {
    routes.IgnoreRoute(“{resource}.axd/{*pathInfo}”);
    routes.MapRoute(
    name: “Default”,
    url: “{controller}/{action}/{id}”,
    defaults: new { controller = “myAction”, action = “Index”, id = UrlParameter.Optional }
    );
    }
    }
    [/csharp]

    As you can see in the Index Action, we are checking whether the request parameter contains the files. If it exists, we will save the selected file to the directory

    /App_Data/uploads/ (that we need to manually create in our application). After returning to the view Upload, we need to set the Upload view.

    Upload View

    The following is the code for the Upload view.
    [html]
    @{
    ViewBag.Title = “Upload”;
    }
    <h2>Upload</h2>
    <script src=“~/Scripts/jquery-1.11.1.min.js”></script>
    <script>
    $(document).ready(function () {
    $(‘#btnUploadFile’).on(‘click’, function () {
    var data = new FormData();
    var files = $(“#fileUpload”).get(0).files;
    // Add the uploaded image content to the form data collection
    if (files.length > 0) {
    data.append(“UploadedImage”, files[0]);
    }
    // Make Ajax request with the contentType = false, and procesDate = false
    var ajaxRequest = $.ajax({
    type: “POST”,
    url: “myAction/Index”,
    contentType: false,
    processData: false,
    data: data
    });
    ajaxRequest.done(function (xhr, textStatus) {
    // Do other operation
    });
    });
    });
    </script>
    <input type=“file” name=“FileUpload1″ id=“fileUpload” /><br />
    <input id=“btnUploadFile” type=“button” value=“Upload File” />
    @Html.ActionLink(“Documents”, “Downloads”)
    [/html]

    In the upload view, we have the following:

  • File uploader
  • Upload button
  • Ajax call to the controller ( myAction/Index)
  • Here, we are adding the uploaded image content to the form data collection.
    [csharp]
    var data = new FormData();
    var files = $(“#fileUpload”).get(0).files;
    // Add the uploaded image content to the form data collection
    if (files.length > 0) {
    data.append(“UploadedImage”, files[0]);
    }
    [/csharp]

    Once the data is added to the form data collection, we will pass the data to the controller via ajax call. Sounds cool, right? If the procedure goes well, we will see the output as follows.

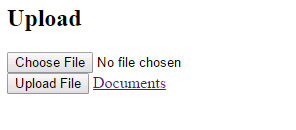
    When you choose the file and click upload, your selected file will be uploaded to the folder “uploads” as we have set it in the controller.

    We have finished the process of uploading files. We will now move to the downloading section. This is the right time to add the remaining actions to our controller. The following is the code.
    [csharp]
    public ActionResult Downloads()
    {
    var dir = new System.IO.DirectoryInfo(Server.MapPath(“~/App_Data/uploads/”));
    System.IO.FileInfo[] fileNames = dir.GetFiles(“*.*”); List<string> items = new List<string>();
    foreach (var file in fileNames)
    {
    items.Add(file.Name);
    }
    return View(items);
    }
    public FileResult Download(string ImageName)
    {
    var FileVirtualPath = “~/App_Data/uploads/” + ImageName;
    return File(FileVirtualPath, “application/force-download”, Path.GetFileName(FileVirtualPath));
    }
    [/csharp]

    Do you remember that we have set an action link in the “Upload” View?
    [html]
    @Html.ActionLink(“Documents”, “Downloads”)
    [/html]

    Next, if we click on the “Documents” link, our Action Result Downloads will be fired, right? Now, the following code will explain what is happening here.
    [csharp]
    var dir = new System.IO.DirectoryInfo(Server.MapPath(“~/App_Data/uploads/”));
    System.IO.FileInfo[] fileNames = dir.GetFiles(“*.*”); List<string> items = new List<string>();
    foreach (var file in fileNames)
    {
    items.Add(file.Name);
    }
    return View(items);
    [/csharp]

    We are considering all the attached files, adding the file information to a list and returning this list to the view “Download”. Next, here’s the need to set another view. The following code is for the Download View.

    Download View
    [html]
    @{
    ViewBag.Title = “Downloads”;
    }
    <h2>Downloads</h2>
    @model List<string>
    <h2>Downloads</h2>
    <table>
    <tr>
    <th>File Name</th>
    <th>Link</th>
    </tr>
    @for (var i = 0; i <= Model.Count – 1; i++)
    {
    <tr>
    <td>@Model[i].ToString() </td>
    <td>@Html.ActionLink(“Download”, “Download”, new { ImageName = @Model[i].ToString() }) </td>
    </tr>
    }
    </table>
    [/html]

    Here, we are taking the information (that we are sending from the controller) about the uploaded files and creating the Html.ActionLinks dynamically.

    Please note that we are adding the Image name to the action. Here is the output after performing the operations.

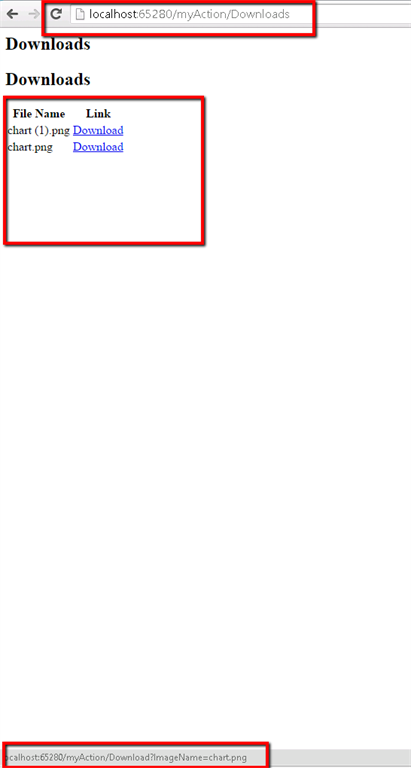
    As in the preceding image, when you mouse over the link, it will show the image name along with the controller URL. Click on the link to download the file. So simple, right?

    Conclusion

    I hope you liked the article. Please provide your valuable feedback; it matters a lot. You can download the source code to determine more.

    Point of interest

    MVC, MVC Upload, MVC Download, File Uploading Using MVC, File Downloading Using MVC

    TagsC#Download in MVCFile Downloading Using MVCFile Uploading Using MVCModel View ControllerMVCMVC DownloadMVC UploadUpload in MVC
    Previous Article

    Using Spire.Doc Introduction

    Next Article

    Microsoft Asp.Net Articles Of The Day (14-Jun-2015)

    0
    Shares
    • 0
    • +
    • 0
    • 0
    • 0

    SibeeshVenu

    I am Sibeesh Venu, an engineer by profession and writer by passion. Microsoft MVP, Author, Speaker, Content Creator, Youtuber, Programmer.

    Related articles More from author

    • Select NuGet Package
      .NETASP.NETMVC Grid

      Using MVC Grid In MVC

      December 11, 2015
      By SibeeshVenu
    • .NETASP.NETBlogC#

      Check a String is Palindrome

      May 31, 2015
      By SibeeshVenu
    • LINQ Basic to Advanced Index View
      .NETASP.NETC#MVC

      LINQ Basic To Advanced – MVC Demo Application

      May 15, 2017
      By SibeeshVenu
    • Run without debugging
      Azure

      Fix To: Bundles Are Not Working After Hosting To MVC Application

      April 24, 2016
      By SibeeshVenu
    • .NETASP.NET

      Determine Which Browser Your Application is Running In

      June 17, 2015
      By SibeeshVenu
    • .NETASP.NETC#Code Snippets

      Split method with a string value in c#

      May 31, 2015
      By SibeeshVenu
    0

    My book

    Asp Net Core and Azure with Raspberry Pi Sibeesh Venu

    YouTube

    MICROSOFT MVP (2016-2022)

    profile for Sibeesh Venu - Microsoft MVP

    Recent Posts

    • Linux Azure Function Isolated Dot Net 9 YAML Template Deployment
    • Build, Deploy, Configure CI &CD Your Static Website in 5 mins
    • Easily move data from one COSMOS DB to another
    • .NET 8 New and Efficient Way to Check IP is in Given IP Range
    • Async Client IP safelist for Dot NET
    • Post Messages to Microsoft Teams Using Python
    • Get Azure Blob Storage Blob Metadata Using PowerShell
    • Deploy .net 6 App to Azure from Azure DevOps using Pipelines
    • Integrate Azure App Insights in 1 Minute to .Net6 Application
    • Azure DevOps Service Connection with Multiple Azure Resource Group

    Tags

    Achievements (35) Angular (14) Angular 5 (7) Angular JS (15) article (10) Article Of The Day (13) Asp.Net (14) Azure (65) Azure DevOps (10) Azure Function (10) Azure IoT (7) C# (17) c-sharp corner (13) Career Advice (11) chart (11) CSharp (7) CSS (7) CSS3 (6) HighChart (10) How To (9) HTML5 (10) HTML5 Chart (11) Interview (6) IoT (11) Javascript (10) JQuery (82) jquery functions (9) JQWidgets (15) JQX Grid (17) Json (7) Microsoft (8) MVC (20) MVP (9) MXChip (7) News (18) Office 365 (7) Products (10) SQL (20) SQL Server (15) Visual Studio (10) Visual Studio 2017 (7) VS2017 (7) Web API (12) Windows 10 (7) Wordpress (9)
    • .NET
    • Achievements
    • ADO.NET
    • Android
    • Angular
    • Arduino
    • Article Of The Day
    • ASP.NET
    • Asp.Net Core
    • Automobile
    • Awards
    • Azure
    • Azure CDN
    • azure devops
    • Blockchain
    • Blog
    • Browser
    • C-Sharp Corner
    • C#
    • Career Advice
    • Code Snippets
    • CodeProject
    • Cognitive Services
    • Cosmos DB
    • CSS
    • CSS3
    • Data Factory
    • Database
    • Docker
    • Drawings
    • Drill Down Chart
    • English
    • Excel Programming
    • Exporting
    • Facebook
    • Fun
    • Gadgets
    • GitHub
    • GoPro
    • High Map
    • HighChart
    • How to
    • HTML
    • HTML5
    • Ignite UI
    • IIS
    • Interview
    • IoT
    • JavaScript
    • JQuery
    • jQuery UI
    • JQWidgets
    • JQX Grid
    • Json
    • Knockout JS
    • Linux
    • Machine Learning
    • Malayalam
    • Malayalam Poems
    • MDX Query
    • Microsoft
    • Microsoft ADOMD
    • Microsoft MVP
    • Microsoft Office
    • Microsoft Technologies
    • Microsoft Windows
    • Microsoft Windows Server
    • Mobile
    • MongoDB
    • Monthly Winners
    • MVC
    • MVC Grid
    • MySQL
    • News
    • Node JS
    • npm
    • Number Conversions
    • October 2015
    • Office 365
    • Office Development
    • One Plus
    • Outlook
    • Page
    • PHP
    • Poems
    • PowerShell
    • Products
    • Q&A
    • Raspberry PI
    • React
    • SEO
    • SharePoint
    • Skype
    • Social Media
    • Software
    • Spire.Doc
    • Spire.PDF
    • Spire.XLS
    • SQL
    • SQL Server
    • SSAS
    • SSMS
    • Storage In HTML5
    • Stories
    • Third Party Software Apps
    • Tips
    • Tools
    • Translator Text
    • Uncategorized
    • Unit Testing
    • UWP
    • VB.Net
    • Videos
    • Virtual Machine
    • Visual Studio
    • Visual Studio 2017
    • Wamp Server
    • Web API
    • Web Platform Installer
    • Webinars
    • WebMatrix
    • Windows 10
    • Windows 7
    • Windows 8.1
    • Wordpress
    • Writing

    ABOUT ME

    I am Sibeesh Venu, an engineer by profession and writer by passion. Microsoft MVP, Author, Speaker, Content Creator, Youtuber, Programmer. If you would like to know more about me, you can read my story here.

    Contact Me

    • info@sibeeshpassion.com

    Pages

    • About
    • Search
    • Privacy Policy
    • About
    • Search
    • Privacy Policy
    © Copyright Sibeesh Passion 2014-2025. All Rights Reserved.
    Go to mobile version