Migrate or Port Your Old Legacy .NET Projects to the .NET5

The word migration means a lot to us, developers, every day we upgrade ourselves by learning new technologies and the situation should not be different when we work on the legacy application. That’s when the use of some cool migration tools coming into the picture. If you are looking for a tool to migrate your legacy old .NET framework projects to the .NET5 version, then you are in the right place. Recently, I got a chance to migrate one legacy application to .NET5, and here in this post, I will be explaining the steps. Throughout the process, I will be using two different tools, “Porting assistant for .NET” by Amazon and .NET Upgrade Assistant by Microsoft. Both tools are Open Source and maintained by the community, free to use. Let’s get started.
Prerequisites
Download the Targeting framework, and install it. In my case, NET5. You can download them from here.
Upgrade Assistant tool by Microsoft
If you choose to use the Upgrade Assistant tool by Microsoft, all you have to do is to install visual studio, install the try-convert tool by running the preceding command.
Install try-convert: dotnet tool install -g try-convert
Update try-convert: dotnet tool update -g try-convert
Now install the upgrade assistant by executing the below command.
dotnet tool install -g upgrade-assistantJust like any other tools, to update the tool, just run the below command.
dotnet tool update -g upgrade-assistantTo get more info about the installation, you can visit this document.
Porting Assistant tool by Amazon
If choose to use this tool, please make sure that you have done the preceding things.
- Signup an account with AWS
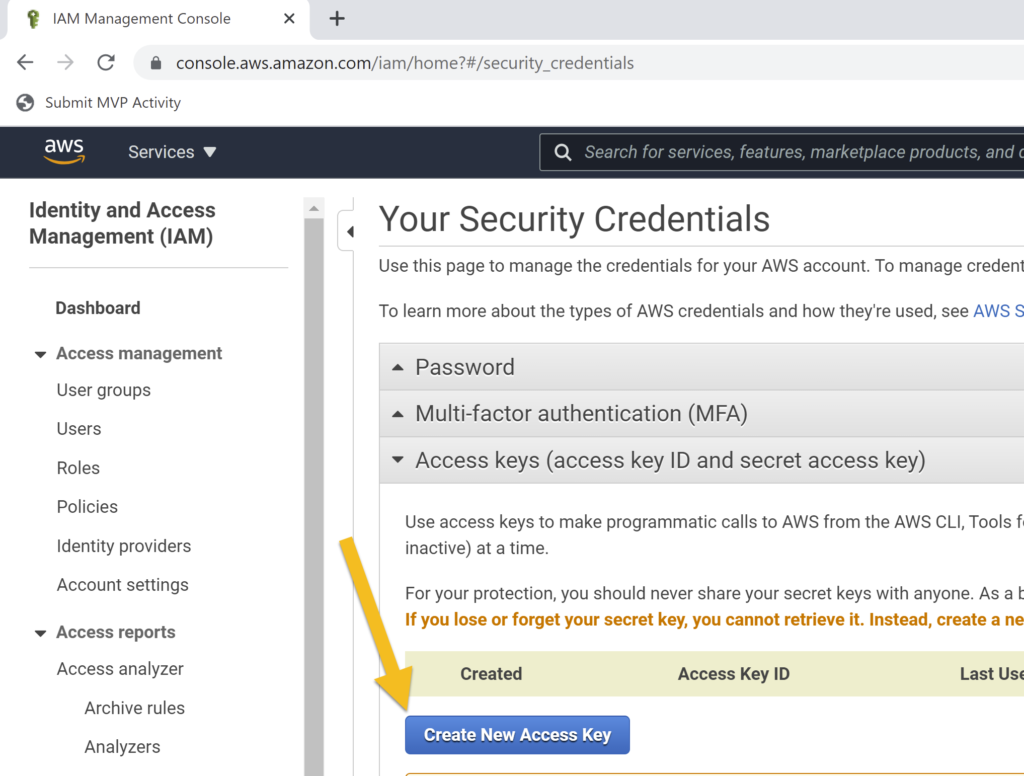
- Log in to the AWS account and collect the security credentials. We will be using this info in our migration. Visit this site, click on the Access Keys section, and then click on the Create New Access Key button. This will generate a new key, download the same and keep it in a safe location.
- Go to this link, click on the Download Porting Assistant for the .NET button to download and install. You can also use the Visual Studio extension from here.
Port the Application
In this section, let’s see how we can use both tools.
Using Upgrade Assistant tool
Using the upgrade assistant tool is as easy as you type some writing some basic commands in CLI. If you have worked with any CLI tools before, this would be very easy.
Once you have installed the tool, you can run the preceding command to start the process.
upgrade-assistant upgrade <Path to csproj or sln to upgrade>This will analyse your solution or the project and give you the commands to perform as in the preceding image. The first step is to select the entry point from your solution, if you are trying to port the entire solution.
The next step is to select the project and select the commands to perform each task. Please remember that you will have to do this for each project. In my case, I was having 43 projects, if you have more projects it can be a pain. Your screen should look like the preceding image.
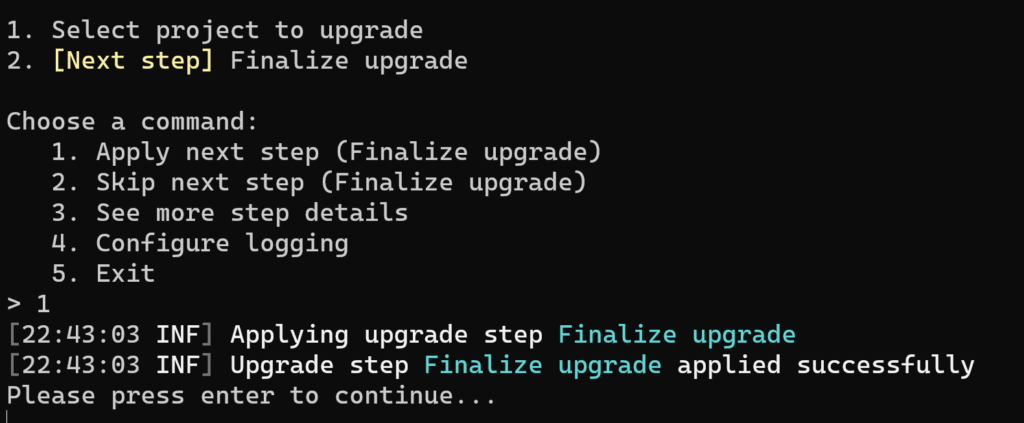
Please keep in mind that I am upgrading my MVC application, and the commands will be slightly different for other .NET framework app types. See more here. Once the tool has gone through all the projects, the last step is to finalize the upgrade. As always, all you have to do is selecting the command.
You should get a message as preceding once the upgrade has been completed.
[22:43:27 INF] Upgrade has completed. Please review any changes.
Upgrade output
[22:43:27 INF] Deleting upgrade progress file at C:\sourcecode\solution-name.upgrade-assistant
PS C:\sourcecode\solution-name>
It is worth noting that you will have to manually do a lot of changes in your solution according to how complex your solution is. Some of the warnings/errors that this tool gives are given below.
- No version of System.Configuration.ConfigurationManager found that supports [“net46”]; leaving unchanged
- No version of System.ServiceModel.Federation found that supports [“net46”]; leaving unchanged
- .NET Upgrade Assistant analyzer NuGet package reference cannot be added because the package cannot be found
- Package AutoMapper has been upgraded across major versions (4.2.0 -> 5.2.0) which may introduce breaking changes
- No version of EnterpriseLibrary.TransientFaultHandling found that supports [“net5.0-windows”]; leaving unchanged
- No version of EnterpriseLibrary.TransientFaultHandling.Data found that supports [“net5.0-windows”]; leaving unchanged
- No version of Microsoft.AspNet.WebApi.OData found that supports [“net5.0-windows”]; leaving unchanged
- No version of Microsoft.Azure.CosmosDB.Table found that supports [“net5.0-windows”]; leaving unchanged
- No version of Microsoft.Azure.DocumentDB found that supports [“net5.0-windows”]; leaving unchanged
- No version of Microsoft.Bcl.Async found that supports [“net5.0-windows”]; leaving unchanged
- Package Microsoft.Web.Xdt has been upgraded across major versions (2.1.1 -> 3.1.0) which may introduce breaking changes
- Package Microsoft.Azure.NotificationHubs has been upgraded across major versions (1.0.9 -> 2.0.2) which may introduce breaking changes
- No version of SharePointPnPCoreOnline found that supports [“net5.0-windows”]; leaving unchanged
- Package Microsoft.Azure.NotificationHubs has been upgraded across major versions (1.0.9 -> 2.0.2) which may introduce breaking changes
- No version of System.ServiceModel.Federation found that supports [“net46”]; leaving unchanged
- No version of Microsoft.Azure.ActiveDirectory.GraphClient found that supports [“net5.0-windows”]; leaving unchanged
- Package Microsoft.Azure.WebJobs has been upgraded across major versions (1.1.2 -> 2.3.0) which may introduce breaking changes
- No version of Microsoft.ApplicationInsights.Web found that supports [“net5.0-windows”]; leaving unchanged
- No version of Microsoft.AspNet.WebApi.Owin found that supports [“net5.0-windows”]; leaving unchanged
- No version of StackifyHttpModule found that supports [“net5.0-windows”]; leaving unchanged
- No version of System.IdentityModel.Tokens.ValidatingIssuerNameRegistry found that supports [“net5.0-windows”]; leaving unchanged
- No version of WebApiContrib.Formatting.Jsonp found that supports [“net5.0-windows”]; leaving unchanged
- No version of Microsoft.AspNet.WebApi.Cors found that supports [“net5.0-windows”]; leaving unchanged
- No version of Microsoft.AspNet.WebApi.Tracing found that supports [“net5.0-windows”]; leaving unchanged
- Package NJsonSchema.CodeGeneration has been upgraded across major versions (1.39.5923.31344 -> 2.65.6055.39156) which may introduce breaking changes
Using Posting Assistant tool
This is how you can use the Porting Assistant tool.
Configure the Porting Assistant tool
Once the tool is installed, open the same and click on the Get started button.
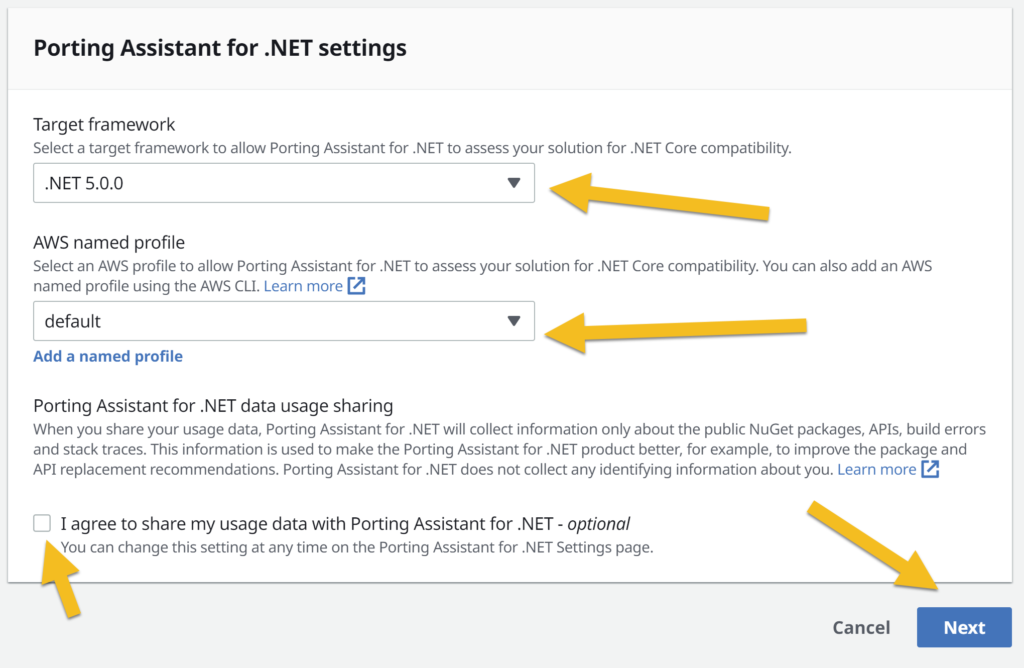
In the new screen, select the target framework and then click on the Add named profile link and provide the Access key information we get from the AWS console.
Click on the Add button, if you want to know more about the named profile, this has everything documented. This is how your screen should look like now.
Using the porting assistant tool
From the above screen, click on the button Next. From here you can select your solution file that holds all of your projects. The tool will start analysing your solution bytes by bytes, depending on the complexity of your solution, this can take a while.
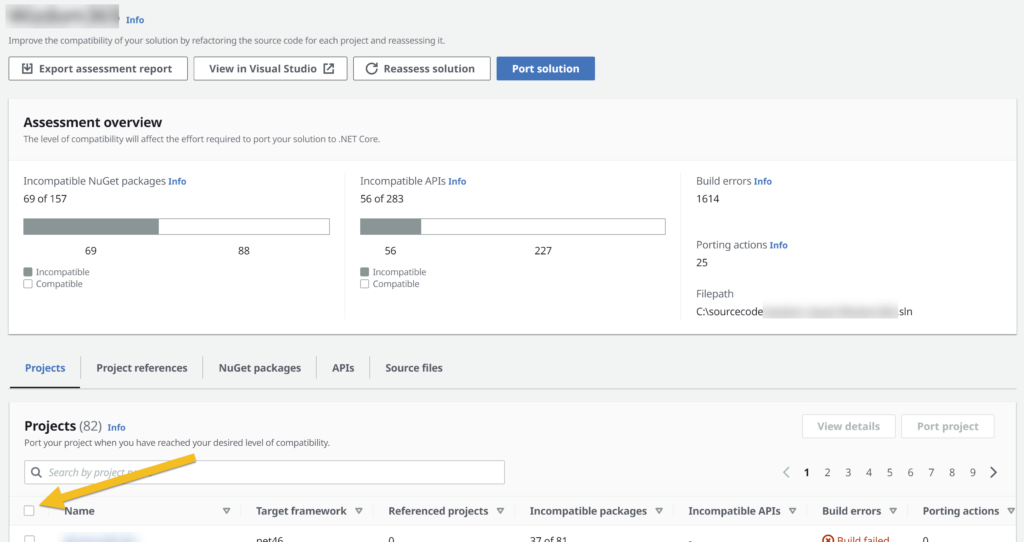
The system will give a message as in the preceding image once the analysing is finished. The screen will also contain information about your Incompatible packages, Incompatible APIs, Build Errors, Porting actions, etc.
Click on the solution name, in the screen you will be able to either select all the projects or one by one at a time and start the porting process.
Clicking on the button Port solution redirect you to another screen, that is where you can change the versions of your packages. And once you finalized that, click on the port button. You should now see a notification saying that the porting has started.
You will also be getting an option to view the logs at the end.
Things to keep in mind
- These tools are just a starting point, and according to the complexity of your application, and the number of APIs or packages incompatible, you may have to manually edit the code and change the package references.
- It will be helpful if you choose to save the accessed solution in the same place if you use any Git branch so that you can see the changes and act accordingly.
- If you use Microsoft Upgrade Assistant, you can choose the given order to perform the port or if you use Amazon Porting Assistant, you can select which project you should be migrated first according to the graph in the Project references tab.
More information about the tools
The .NET Upgrade Assistant is a CLI tool introduced by Microsoft, and with this tool, you can easily migrate any old application to new versions. You can read more about this tool here.
The tool “Porting Assistant for .NET” is developed by Amazon. You can read more about this tool here.
To get more understanding about this “Porting Assistant for .NET” tool, I recommend you to watch the preceding video.
Conclusion
In this post, we learned the preceding things.
- What is Upgrade Assistant tool from Microsoft
- How to configure and use Upgrade Assistant tool from Microsoft
- How to migrate from old .NET framework project to new .NET 5 version
- What is the Porting Assistant for the .NET tool
- How to configure the Porting Assistant for the .NET tool
I will be updating this post if I find any information needs to be added in the future.
About the Author
I am yet another developer who is passionate about writing and video creation. I have written close to 500 blogs on my blog. And I upload videos on my YouTube channels Njan Oru Malayali and Sibeesh Passion. Please feel free to follow me.
Your turn. What do you think?
Thanks a lot for reading. Did I miss anything that you may think is needed in this article? Could you find this post useful? Kindly do not forget to share your feedback.
Kindest Regards
Sibeesh Venu

